Installation
To install the Sendcloud plugin for Craft CMS, follow these steps:
- Open your terminal and go to your Craft project:
cd /path/to/project - Then tell Composer to load the plugin:
composer require white-nl/commerce-sendcloud - Install the plugin via the CLI:
./craft plugin/install commerce-sendcloud
You can also install the Sendcloud plugin using the Plugin Store in the Craft Control Panel. Go to Settings → Plugins and click the "Install" button for Commerce Sendcloud.
# Activating your license
This plugin requires a commercial license. After successfully installing the plugin, you’ll see an alert bar in Craft. Click this bar to activate your license in the Craft plugin store, using your Craft ID.
# Basic setup
After installing, open the plugin’s settings page in your Craft project to do the actual Sendcloud setup in Craft.
# Connecting Craft with Sendcloud
Make sure your Craft website is accessible by the Sendcloud servers. Then use the Register button to connect with Sendcloud. You will be redirected to the Sendcloud website and asked to confirm the integration. After setting up a connection the connection status should be Active (you may have to reload the page to see the changes).
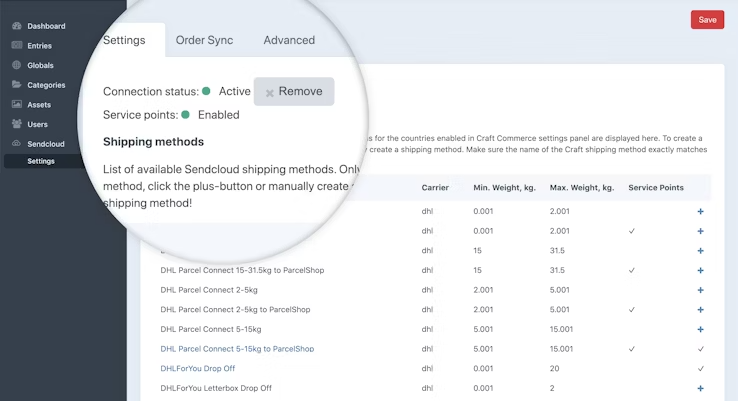
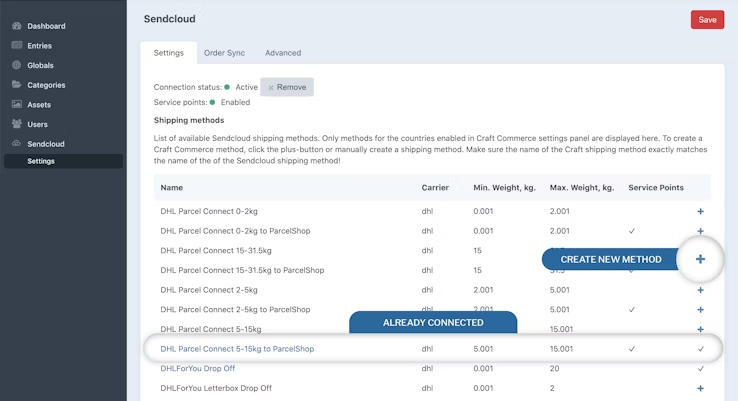
# Creating shipping methods
Next step is to create the Shipping methods for Sendcloud in Craft. The list below the connection status is showing all available Sendcloud shipping methods for enabled countries in Craft Commerce store settings. If you can’t see some of the shipping methods please make sure you have corresponding countries enabled in Craft Commerce. To create a Commerce shipping method click the plus (+) button or manually create a shipping method with the exact same name as the Sendcloud shipping method! You also have to configure shipping rules for the newly created shipping method for it to appear on the frontend.
# Selecting order status for pushing to Sendcloud
On the plugin settings Order Sync tab select the Craft order status for the orders you want to be automatically pushed to Sendcloud. (You can select more than one).
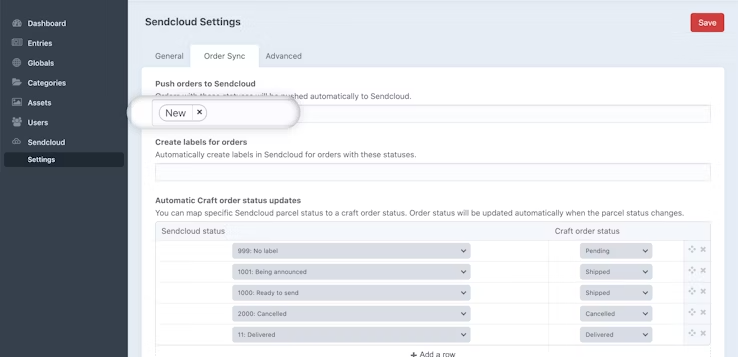
Please note that the shipping method could not be sent to Sendcloud before you create a label. If you just push the order without creating a label, the order in Sendcloud will end up with the default shippingmethod.
If you wish to create labels automatically when an order transitions to a specific order status, you can do so by selecting the status in the "Create labels for orders" option.
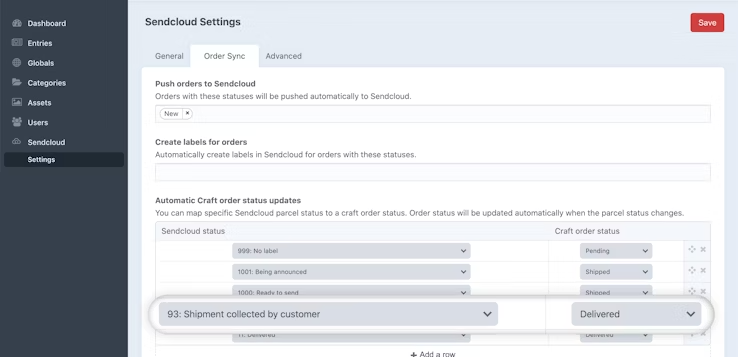
# Mapping Sendcloud parcel statuses to Craft order statuses
If you wish to automatically update order status in Craft according to Sendcloud parcel status, map specific Sendcloud parcel status to a Craft order status. Order status will be updated automatically when the parcel status changes. When Craft receives an unmapped parcel status it will be ignored. If you don't assign any status then no orders will ever be updated.
# Save settings
There are more optional things to set up, but this is the basic you have to do. Now you can test this integration by creating a test order in your project and check your Sendcloud account to see your test order.
Don’t forget to save the plugin settings in Craft.