General operation of the detail page
In this chapter, you’ll find a general explanation of the components of a Craft CMS detail page. You’ll encounter these pages in various places within the Control Panel, such as in the sections Entries, Categories, Assets, and Users. While the content may differ per component, the way they work is largely the same everywhere.
# Breadcrumb, Multisite & Revisions
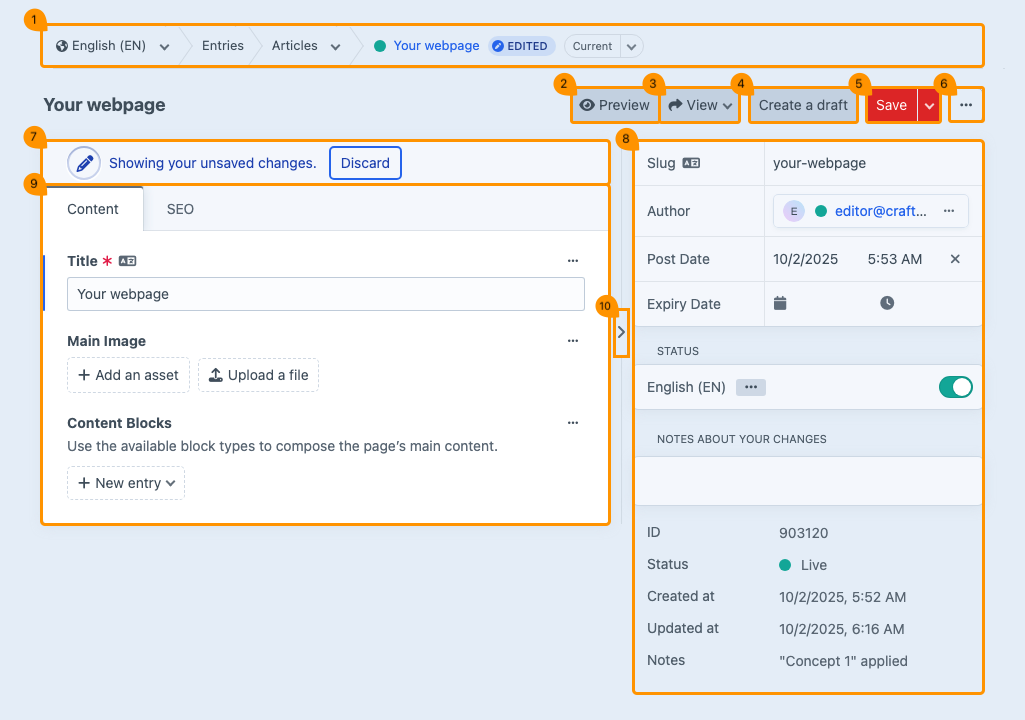
(regarding block 1)
As described in the chapter General operation of the overview page, the button next to the title is a multifunctional button. Depending on what you have chosen before arriving at this detail page, the system determines what options you still have here.
# Breadcrumb
At the top of the page, a path is displayed: the breadcrumb. This navigation aid clearly shows your exact location within the structure of the website. Each step in this path is clickable, allowing you to easily return to a previous page or category.
Some steps have a menu, which can be recognized by the downward-pointing arrow.
# Multisite
When you manage multiple sites within a single Craft environment (multisite), the breadcrumb always starts with a button that displays a globe icon. From there, you can switch between sites. You will then be taken directly to the same entry on the other site.
Craft treats your site in another language as a separate website.

# Revisions
Under the multisite button, you can also find a list of all the dates when an item was edited. After saving, it will be added to the list. The list can go back to 50 moments in time.
Whether you have the possibility of revisions depends on the settings made by the developer. This also applies to how many instances you can go back in time.
When you click on a line with a certain date, you can jump back to the moment of its edit. Using the Revert entry to this revision button at the top right of the page, you will undo ALL edits made after this point.
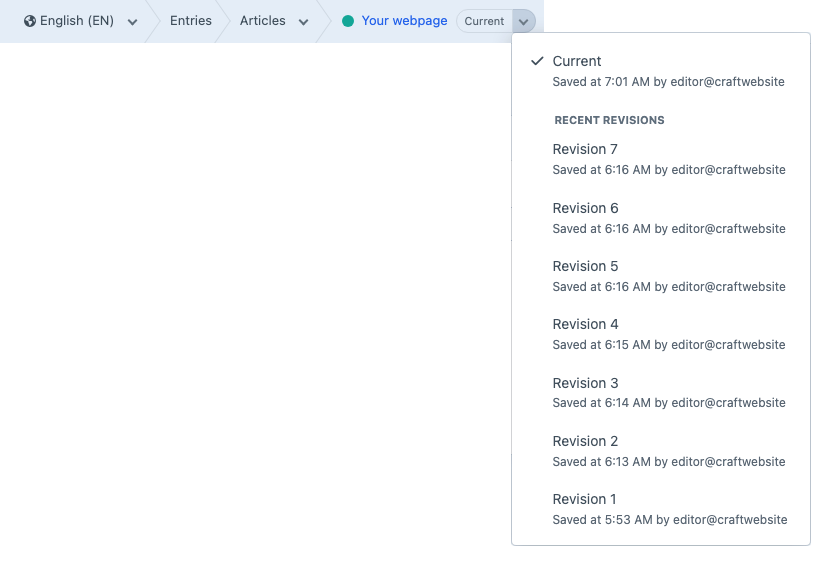
The tracking of revision points, as well as the number of available versions, is determined by the developer’s settings.
Clicking on a revision with a specific date allows you to return to that edit. By selecting Restore content from this revision at the top right, all later changes will be undone.

You cannot clear the built-up revision history yourself.
# Preview
(regarding block 2)
Using Preview, you can edit a page and immediately see how the change would look after publication (WYSIWYG). This way, you can review your adjustments first, without them being visible to website visitors right away.
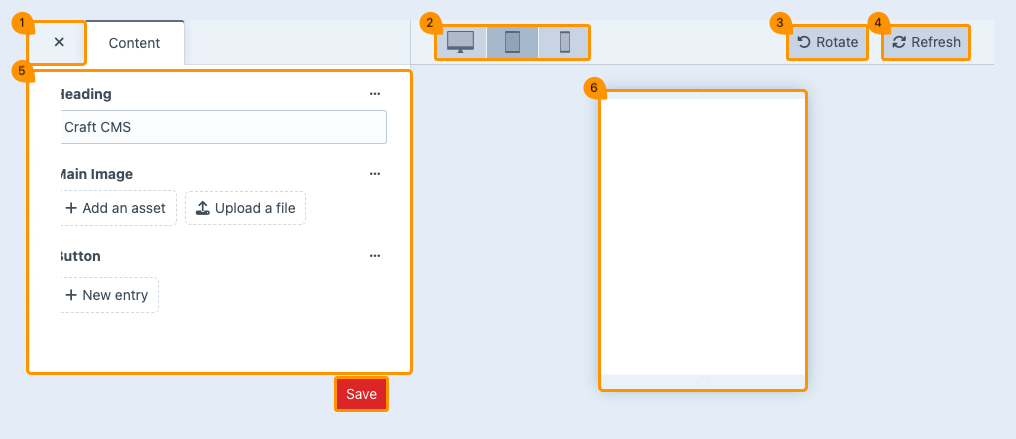
| Function | Description |
|---|---|
| (1) Close | Button closes the window. Changes are NOT undone. |
| (2) Display size preview | Button to display the page in the desired screen format. |
| (3) Rotate | Button to simulate a rotated screen (available only for Tablet and Mobile). |
| (4) Refresh | Button to reload the page. |
| (5) Page editor | Area where you can make changes directly. |
| (6) Preview | Area where your changes are immediately visible in a preview. |
| (7) Save | Button to publish changes. You will then return to the detail page. Use Close (1) if you want to keep the changes as a draft. |
# View
(regarding block 3)
Through View>Primary entry page, you can immediately see how the change would look after publication, but without the editor (as described under Preview). This way, you can review your adjustments first, without them being visible to website visitors right away.

The dropdown menu may display additional options, depending on installed plugins.
# Creating a draft
(regarding block 4)
Use Create a draft to make changes to a live page without them being immediately visible to visitors.

With the Save draft button, you can save your changes while editing or continue working on them later.

Use the Apply draft button to make your changes visible on the live page.

When you create a new page, you can first save it as a draft. This gives you the opportunity to make adjustments until you publish the draft and the page becomes visible on the website (live).
Earlier, we described another use of a draft: temporarily saving changes to an existing live page before they are published.
# Save
(regarding block 5)
By clicking Save, you store the changes you’ve made. When this is successful, a pop-up notification will appear at the bottom left of the page as confirmation.


Next to the red button, you’ll find a dropdown menu with useful options.

| Function | Description |
|---|---|
| Save and continue editing | Save your edits in between. You won’t leave the page. |
| Save and add another | Save your edits and create a new similar page. |
| Save as a new entry | Save the page as a new entry. |
# More actions
(regarding block 6)
Next to the red dropdown menu, you’ll find a menu with additional options.

| Function | Description |
|---|---|
| Copy entry | Creates a copy of the current page. The copy remains on the clipboard until you use it somewhere else. |
| Delete entry | Deletes the page. |
The options shown in the dropdown menu may vary per page.
# Unsaved changes
(regarding block 7)
When you edit an existing item, the changes are temporarily saved but not yet applied. A blue notification will appear: “Showing your unsaved changes.” With the Discard button, you can undo these.

These unsaved changes are not yet visible to your website visitors.
# General page details
(regarding block 8)
# Slug
The slug is a part of the page URL, usually derived from the title and/or function of the item, and it must be unique for each page. When a slug is already in use for another page, Craft will automatically add a number to the duplicate slug. A duplicate slug looks like this: /contact-1. The slug is often placed after the domain name. For example, a URL could be: https://www.yourdomainname.nl/contact .
When viewing an existing item, you will usually already see a slug here. If necessary, the slug of an existing item can be adjusted. In most cases Craft will automatically update internal links after changing the slug.
Please note that changing a slug alters the page URL, which may result in broken external links and could impact your search engine ranking.
# Author
Name of the author.
# Post Date
Date and time of the item.
# Expiry Date
Expiration date and time of the item. After expiring, the item will no longer be visible on the website.
# Status
Toggle to activate or deactivate the item. In the case of a multisite setup, you can also configure this separately for each site.
# Notities
Space for adding a short explanation what you’ve changed about an item.
# Other
| Function | Description |
|---|---|
| ID | Unique identification number of the entry. |
| Status | Indicates whether the entry is live or not. |
| Created at | Creation date of the entry |
| Updated at | Last modification date of the entry |
| Notes | Most recently added note |
# Tabs
(regarding block 9)
On the detail page, you will usually find several tabs. This depends on how the developer has set things up.
Almost always, you will see the 'Content' tab. In this tab, you can find existing content blocks or add new ones. These blocks contain specific information and are the building elements of your website. For more details, see the chapter Entries – Matrix blocks.
# Hide details
(regarding block 10)
Click the arrow to hide the details section. This gives you more space on the detail page.
