Entries
Your website consists of various pages with content such as text, images, forms, and videos. This content is also referred to as content. You can manage it through the Entries menu. In this chapter, you’ll learn how to edit pages.
Select Entries from the left-hand menu. A new light gray menu will then appear on the left side. This menu is divided into several sections, including All entries, Singles, Channels, and Structures.

# All entries
Select All entries. All available content is shown in one list.

# Singles
Under Singles, you’ll find pages that serve a specific purpose within the website. These pages stand alone and can only be created by a developer. However, the content of these pages can be edited independently. Examples include the homepage and the 404 error page.
# Channels
All date-based content is collected under Channels. The order of this content is determined by the creation date. Therefore, it’s not possible to adjust the order unless the date of the specific item is changed. An example of a channel is a blog page.
# Structures
Items in the Structures section are the most common. They are used for content that is not time-based, such as the description of your services. The order of these items can be adjusted by dragging them using the four dots.

A brief message will appear at the bottom left of the page confirming that the new position has been saved. This change is applied immediately and therefore instantly visible to visitors of the website.

# Matrix blocks
Unlike what you may be used to, Craft does not work with “What You See Is What You Get” editor pages. In practice, this approach often proves error-prone and can lead to a confusing mix of content and formatting. For that reason, we expect you’ll find working with Matrix blocks to be a clear and pleasant experience.
A page within your Craft website consists of various blocks containing specific content. You can think of these blocks as the building blocks of your website. Without them, your website contains no information and the page remains empty.
During the development of your website, it was determined which blocks are available and how they behave when displaying content. This gives you maximum flexibility to add and adjust content yourself without having to worry about the technical aspects.
After your website has been delivered, several content blocks will already be set up for you. On the front end of the website, you’ll notice many similarities between the content and the blocks you use in the editor. You can easily modify text and images yourself, and once saved, these changes are immediately visible.
Because each website has its own set of Matrix blocks, we’ll focus below on the general functions.
Create a new entry or open an existing one. At the bottom of the page, you’ll find Add a block, where you can choose from the available content blocks. Select the desired block and fill in the fields.

At the top right of each content block, you’ll find a menu with additional options. This menu contains the options that are specifically available for that content block.
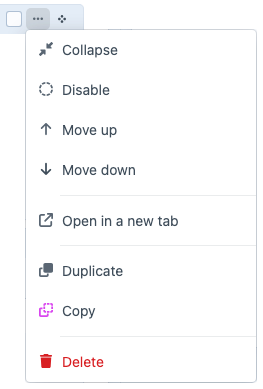
| Function | Description |
|---|---|
| Collapse | Collapse a content block to save space. |
| Disable | Disable the content block; it will no longer be displayed on the live page.  |
| Move up | Move the content block up one position. |
| Move down | Move the content block down one position. |
| Open in a new tab | Open this content block in a new tab. |
| Duplicate | Create a duplicate of the content block. |
| Copy | Copy the content block to the clipboard to paste it later.   |
| Delete | Delete the content block. |
Depending on the type of content block, additional options may appear in the dropdown menu.
Drag the content block using the four dots to adjust the order. Release it once it’s in the right position.
